
Need to update several images on WordPress pages without having to do each one manually? Read on!
Question:
Every month, I update JPGs to the same WordPress posts. The images are bar/progress charts, so the only change is that they include a new month of data. But, the Baptisms image always goes into the Baptisms post and so on. The current system includes going into the media library and uploading the new pic and then going into the post, deleting previous months image and uploading that new image. Is there a way to make this more automatic? There are 40+ images and this process is a pain! – Colleen
Answer:
Use FTP to copy the new images directly onto the web server. In less than a minute, you can overwrite all the images in one shot. No editing posts in WordPress required.
This will take a bit of set-up in the beginning, but the time savings will make up for it your first week. If you’re not a techie, the process is going to be more unfamiliar than difficult. You can do it!
1. Login to your hosting company and create an FTP account for yourself (CPanel Instructions)
2. Download & Install FileZilla Client version. This is what you’ll use to basically access all the files on the server that run your WordPress site
3. Within FileZilla go to File -> Site Manager. Use the FTP account details you created to connect to the server. Here’s an example:

4. Once it connects, you’ll see your computer on the left side, and the server on the right. Be careful, because these are the actual files that make up the website, so don’t willy nilly delete any by accident! You can navigate through these folders via the top menu, or double clicking on the bottom folder icons (the folder with “..” will take you UP a directory).
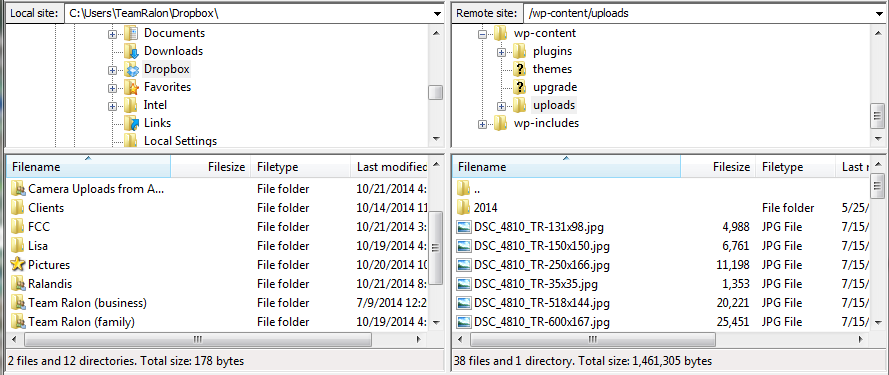
I found my images in wp-content/uploads. Sometimes WordPress creates year/month folders. What I would do personally would be to create a new folder in the uploads folder (right click – “create directory“) and call it “weekly”. I would put all my weekly images in there. Then each week I could just replace these and I’d know for sure I wasn’t overwriting any other files in any other directories.
To copy files into a folder, navigate to the appropriate folders on the left side and the right side and then right click the files you want to copy on the left side and click “upload“. Do this will all the latest images you have for the desired posts (Ctrl+A to select all). (Note: Images uploaded via FTP won’t show up in your WordPress Media Library, just FYI).
5. Next up, we’re going to set all the WordPress pages to access the new images. This’ll be the last time you have to go through each post. You’ll click to edit the current image and then choose “custom URL” and update the URLs to link to the new images (for example: www.website.com/wp-content/uploads/weekly/baptism.jpg).

Ta-da! The hard work is done! You’re all set for some time-saving action each week.
6. Your weekly process will look like this: you’ll name the new images to have the EXACT same name as the old ones. Make sure the case is the same, even on the extension (baptism.JPG and baptism.jpg). You’ll open Filezilla and overwrite all the old pictures with new ones, in one fell swoop. When WordPress goes to look for the image to show on the page, it’ll reference your new image.
The best part – this process will take seconds each week, instead of the 20-30 minutes it probably took before. Yay! You’ve now saved a good bit of time and a whole lotta hassle each week!